ITメモ

ITのこと学習中

Teamsの承認機能

Power Automateの承認、Teamsに連動しているのは知らなかった。Business  CentralからPower Automateを利用した承認ワークフローを動作させると、Teamsでも承認できる。これ、Teams(M365)、Power Automate、Business Centralでサービス跨っている。

Teams can manage Power Automate approval workflow from Business Central.

Power Automate approval workflow on Teams

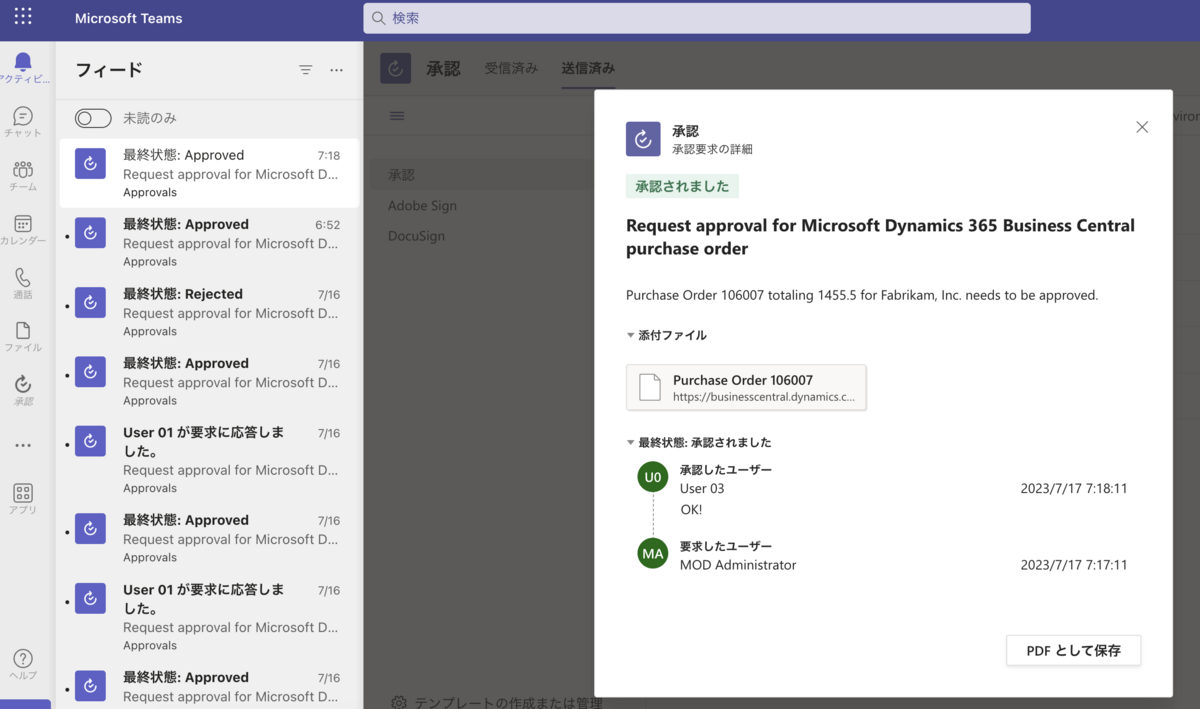
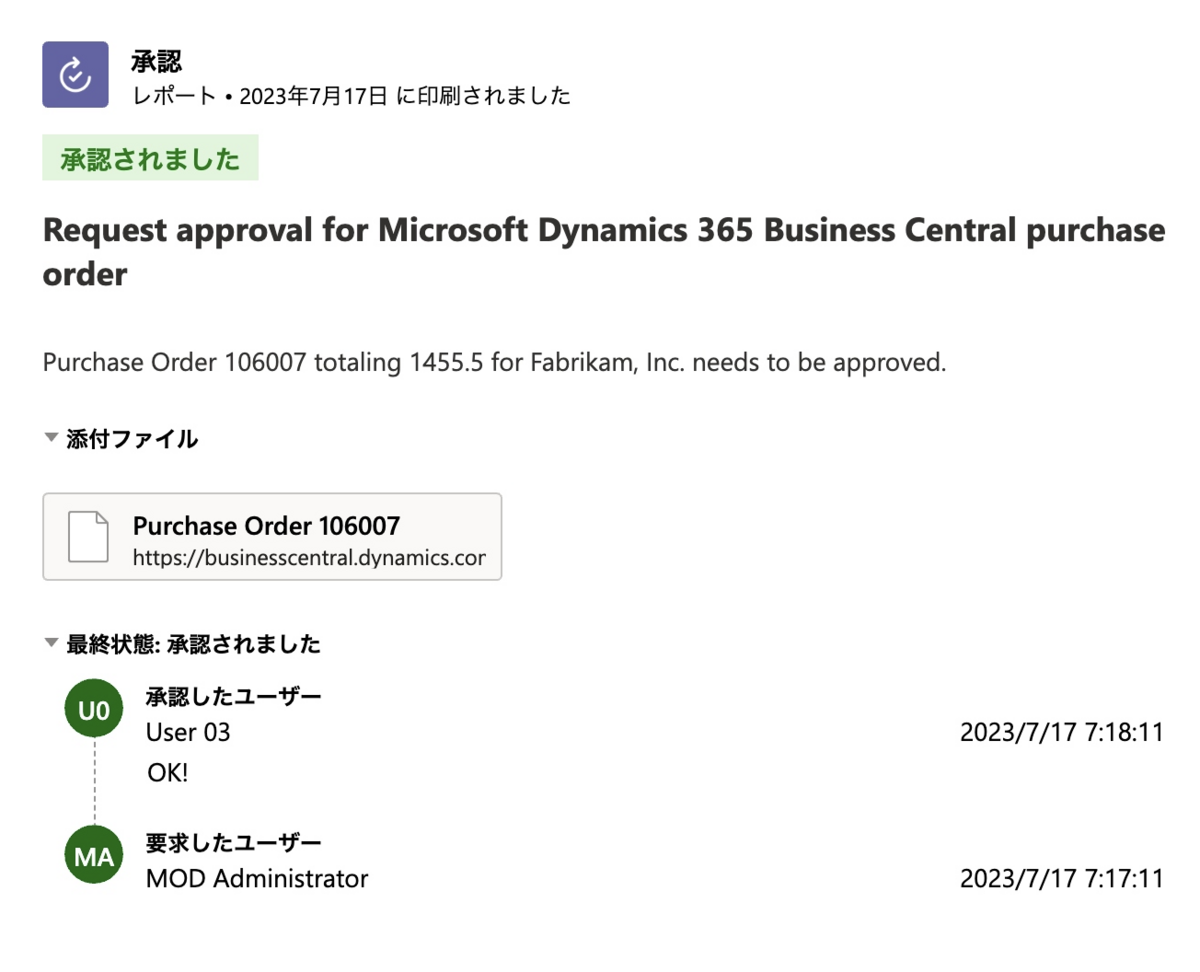
「PDFとして保存」すると画面で見たままのが保存された。役に立つかな?

Save as PDF on Teams

TeamsのPDFとして保存

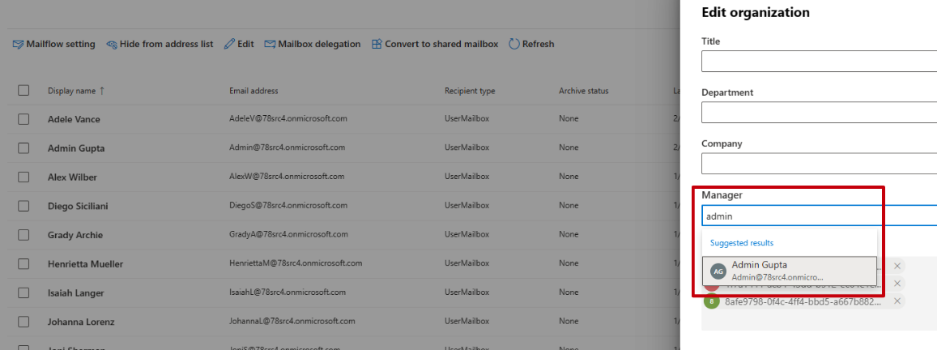
Microsoft 365でユーザーと組織を管理できれば承認フローとか楽にできるかも。でなければ、SharepointのリストかExcelでユーザーと承認者管理を行っていくのがいいのかな。


Business Central ユーザーから、Teamsで共有して貰えば、M365ライセンスだけでBusiness Central の内容の確認可能なので、TeamsでBusiness Central の情報をアダプティブカードで共有して、そのまま承認してってできるかな?その場合、承認者はBusiness Central 内のドキュメントの更新ができないので、承認にはならないから意味がないか。。。ステータスをPending ApprovalからReleaseに変えるために、Business Central のライセンスは必要になる。

もしTeamsを使ってアダプティブカードの返事だけで承認っぽいことができればいい、とかなるとどうだろう?その間Business Central側は、更新し放題だからそれはそれで問題が出る。


Memo of Business Central with Power Automate approval workflow

Setting up a Power Automate flow becomes easier on Business Central.
But a multiple approver flow template is something wrong. If setting up Power Automate approval workflow requires some additional operations, my understanding is wrong...

Create a Power Automate approval workflow on Business Central

Create a Power Automate workflow on Business Central

Set multiple approvers

Multiple Approvers

The approval workflow is created on Power Automate automatically.

Approval Workflow on Power Automate

Approval Workflow on Power Automate


When all approvers approve the document, the result on Power Automate Condition returns Reject. Why?

All approvers apporved

Result is "Reject"

Result is "Reject"

Because Result value on Condition, I don't know it's string or array, is "Approve, Approve,...".   when multiple approvers approve a document.
Power Automate accepts it as Approve on Condition, that's why the result is always Reject.

I've changed the condition from "Result is Approve" to "Result does not contain Reject". I am not using Power Automate in English. The text may not be correct. Then the multiple approver workflow works on Business Central.

Switch Condition


シーケンシャル承認に出てくる上司の設定箇所

Power Automateで紹介されている休暇申請承認ワークフローにある上司の取得。

複数の承認者が存在する最新の承認ワークフローを作成する - Power Automate | Microsoft Learn

この上司はどこに設定するかわからなかったので、Googleで検索。
ExchangeでメールボックスまたはAADでユーザーに設定しているマネージャーのことでした。


設定方法その1
1.Exchange 管理センターを開く
2.ユーザーを選択する
3.Organization(組織)タブを選択し、組織情報編集できるようにする
4.マネージャーの項目にユーザーを設定する

Set Manager in Exchange admin center


設定その2
Azure ADを使って設定する
1.Azure AD(Microsoft Entra管理センター)を開く
2.すべてのユーザーを開き、ユーザーを選択する
3.プロパティの編集をクリックして編集画面を開く
4.マネージャーの項目にユーザーを設定する

Set Manager to an user in Azure AD (MS Entra)


どちらも設定してから有効になるまでしばらく時間がかかるらしい。15分~1時間くらい。


一括でマネージャー登録できる方法はあるのかもしれないのですが、調べきれず不明。100人くらいユーザーがいる組織でも1ユーザーずつ手で設定するとなると、組織改編時とかどうすればいいのだろう?1つずつ対応だろうか。それに業務に応じて複数のマネージャーがいる場合とかだと対応できないような気がする。


JP(W1)環境でContoso Coffee Demo Dataが使えた...と思ったらDocker版だから

Contoso Coffee Demo DataがW1(JP版)でも使えるようになったみたい、、、と一人で盛り上がっていたら、Docker版だけでした。Saas版は使えなかった。

Contoso Coffee Demo DataはProductionモジュール用のサンプルデータとその設定になります。受発注等のトランザクションデータがあるとインポートできないデータセットで、デモやトレーニング専用です。

Extension ManagementにContoso Coffee Demo Dataがあるので、それをインストールします。

Select Contso Coffee Demo Dataset in Extension Management

Extension Management List

するとインストールされるので、Contoso Coffee で検索します。

Search Contoso Coffee

サンプルの設定が設定されているので、確認したら、「Create Demo Data」をクリックしてデータセットを現在のCompanyへ設定します。

Create Demo Data

しばらく待つとデモデータが使用できる通知が出ます。ItemやProduction BOMを確認すると設定されていることがわかります。

Item List

Contoso Coffee Demo Items

Production BOMs

Production BOM example

Contoso Coffee Demo Data Production BOM

Routes(工程)

Contoso Coffee Demo Data Routes in Business Central

Contoso Coffee Demo Data Routes


Excel app is must for Business Central admin

In editing Excel file from Configuration Package, Excel is necessary. Other office application like Google Spreadsheet,  LibreOffice Calc, or else cannot edit the file. Cannot edit was too much. Those apps can edit, but not enough for the exported file.

LibreOffice can edit the exported file.

After editing the file, other office apps, Google Spreadsheet, LibreOffice Calc, or etc., delete XML map from the Excel workbook.  Excel for Web cannot even open the exported files from Configration Package. 

1) LibreOffice (v7.4)

Config. Package Data in LibreOffice

Config. Package Data in LibreOffice

The file can be imported into Business Central.

The file can be imported but...

Error: The Excel workbook must contain an XML map.

The Excel workbook must contain an XML map.

2) Google Spreadsheet

Google Spreadsheet can also edit the file, but saves it as .xlsm format. So Configuration Package rejects the file because of the extension is wrong.

Edit in Google Spreadsheet

Google Spreadsheet

Error: Unsupported file extension (.xlsm)

Error: Unsupported file extension (.xlsm)

What if change the file extension from .xlsm to .xlsx?  

The same error as LibreOffice comes out.


In order to edit Configration Package file, at least one Excel app is necessary.

If you believe Google Spreadsheet is enough, get good support from a solution partner for Business Central.


WindowsにDocker Engineをインストール

Business CentralをDockerを使ってインストールしますが、Docker EngineとDocker クライアントをインストールする方法がマイクロソフトから紹介されてます。

learn.microsoft.com

Windows環境へDockerをインストールする方法になります。
対象のWindows OSは(2022年10月の時点)

  • Windows 10 Professional または Enterprise 以上で Anniversary Update (バージョン 1607) を適用済
  • Windows Server 2016、あるいは Windows Server 2019

Windows Serverでの方法

Windows PowerShell を管理者  として開き、次のコマンドを実行
Install-Module -Name DockerMsftProvider -Repository PSGallery -Force
Y (はい) を選択

Install-Package コマンドでパッケージをインストールし、すべて「はい」 を選択
Install-Package -Name Docker -ProviderName DockerMsftProvider

コンピューターを再起動
Restart-Computer -Force

Windows 10の場合、Docker Desktopをインストールし、Switch to Windows Container...でWindowsコンテナを使うように処理をしてから、アンインストール。1日以内だからDocker Desktopの料金かからないかも?Host OSのDockerでLinuxコンテナは使えなくなります。

Docker Desktopアンインストール後、Docker EngineとDocker Cliは自分のPCに残りました。

Docker公式のバイナリURLからDocker をダウンロードしてインストール後、環境変数PATHを設定して使う方法もあります。

またはFreddyさんが公開しているPowerShellスクリプトでDockerを入れることも可能です

https://github.com/microsoft/nav-arm-templates/blob/master/CleanupAfterDocker.ps1


これでDynamics 365 Business CentralをDockerを使ってインストールできます。


Windows 11 ProにDockerを使ってBusiness Central Sandboxをインストール

Docker版Business Centralのインストール方法。これでテスト/デモ環境が手に入れられる、かも。

Docker Desktopをインストール

Hyper-Vを有効にする

LinuxコンテナーからWindowsコンテナーへ変更する

管理者モードのPowerShellでBcContainerHelperをインストール

BCContainerHelperを使って、管理者モードのPowerShellでBusiness Centralをインストール

インストールには下記内容を張り付けてインストール開始。

Measure-Command {
    $artifactUrl = Get-BCArtifactUrl -select Latest -country jp
    if ($credential -eq $null -or $credential -eq [System.Management.Automation.PSCredential]::Empty) {     
  $credential = get-credential -UserName $env:USERNAME ` 
                               -Message "Please enter your Windows credentials." 
  } 
    New-BcContainer `
        -accept_eula `
        -containerName bcdemo `
        -artifactUrl $artifactUrl `
        -Credential $credential `
        -auth UserPassword `
        -updateHosts `
        -isolation hyperv `
        -imagename bcdemo
}
    

インストールに成功するとデスクトップにこんな感じでアイコンが並ぶ。Edgeのアイコンをクリックすると、Business Centralの画面が開けば成功。

3 icons on Desktop after Business Central installation

完成後のデスクトップ

Docker Business Central

Docker版Business Central

Docker版のBCサンドボックスで作成で困ったことはDocker runをしたときのエラー。

Docker Build failed with exit code -1
At C:\Program Files\WindowsPowerShell\Modules\BcContainerHelper\4.0.5\ContainerHandling\New-NavImage.ps1:557 char:25

... throw "Docker Build failed with exit code $LastExitCode"
             ~~~~~~~~~~~~~~~~~~~~~~~~~~~~~~~~~~~~~~~~~~~~~~~~~~~~~~~~

という感じで出て意味がよくわからなかったので、GoogleでサーチしてFreddyさんの回答を参考にした。

Troubleshooting Business Central on Docker | Freddys blog

大体がアンチウイルス/インターネットセキュリティが原因で起こっていることが多く、バグではなくDockerのことを考えていないシステム設定が問題とのこと。

Windows 11にDocker入れて、Hyper Vを有効化して、BitLockerが動いて、工場出荷状態に戻して、またWindows 11にアップグレードして、、、と繰り返してようやくインストールできたので良かった。

2022/10/3に最新版(v21.0)が出るので、また今日インストールできたBusiness Centralのバージョンがv20.5なので、再びインストールしなければ。。。