ITメモ

ITのこと学習中

Excel オンラインからCSV出力する

ExcelオンラインでCSV出力ができる様になったとのことなので、早速試してみました。

Business CentralのCustomerリストをCSV出力をしてみました。Business CentralのCustomer リストをOpen in ExcelExcelで出力し、OneDrive for Businessに保存します。

Select Open in Excel in Customers list on Business Central

Open in Excel in Customers list

Excel出力したファイルがOneDrive for Businessに保存されます。

Business Central Customers list in OneDrive for Business

これを File > Export > Download this sheet as CSV (.csv)でCSVで出力します。

CSV Export from Excel Online

CSV出力を確認しましたが、、、日本語は????に変換されました。C00010から始まる行が、株式会社東京商事と入力していた箇所です。

Excel OnlineからExportされたCSVファイル

Download as PDFを選択してPDF出力すると、日本語も表示されて出力されました。

Excel OnlineからPDF出力されたCustomersリスト

PDFのCustomersリスト

Excel OnlineからのCSV出力は、文字コード等の設定が見当たらないので、今のところ設定がなさそうです。

ところで、Business CentralからOpen in Excelを利用してExcelファイルをOneDrive for Businessに出力するには、設定が必要です。

OneDrive Setupを開き、「Use with system features」を有効にすれば利用できます。デフォルトではこの値は無効になっています。

OneDrive Setupの設定画面


Copilot for Finance for Excel (Preview) を試してみた

Microsoft Copilot for Finance の Preview が発表されたので、適当にテストしてみました。

news.microsoft.com

Excelを持っていないので、オンラインのExcelを利用するため、M365管理センターから使えるように設定。

設定からアプリを取得し、組織で利用できるよう設定しました。

Install and Deploy Copilot for Finance App for Microsoft Excel (Preview)

設定が成功すれば、Copilot for Finance (Preview)が見えます。

Copilot for Finance for Microsoft Excel (Preview)

Preview版なのでReconcile dataという機能のみ利用できます。シートに登録したテーブルのデータを比較してくれます。そこで、買掛金と銀行入出金データを比較してくれるかどうか試しました。

Bank Reconciliation Report(銀行調整勘定)レポートのように値を比較して整合性をとり、サマリレポートを作成してくれました。元のデータの作りが悪かったせいか、マッチしたデータは0という結果になっています。

Reconciliation Report Sample

比較をするためのデータをExcelに登録しますが、そのデータはテーブルにする必要があります。比較データを入力する画面には、ワークシートとテーブル登録が必ず必要です。

Copilot

設定したテーブル情報を検証してCopilotが対象となる項目を自動で取得してくれます。Regenerateボタンをクリックすれば何度か作成しなおしてくれます。またはDismissボタンを押して、自分で設定することもできます。

Copilot for Finance (Preview) 行設定

簡単なデータの整合性だと楽にとってくれました。

例えば、得意先の前月売上の売掛金と当月入金額の比較

レポートを作成すると

Reconciliation Report Sample

PDFでサマリレポート部分を出力することもできます。日本語がうまく出力できないのはいただけないですね。。。

Summary Report PDF

サマリレポート(PDF)


Business Central Environment Transfer between MS Entra Tenants

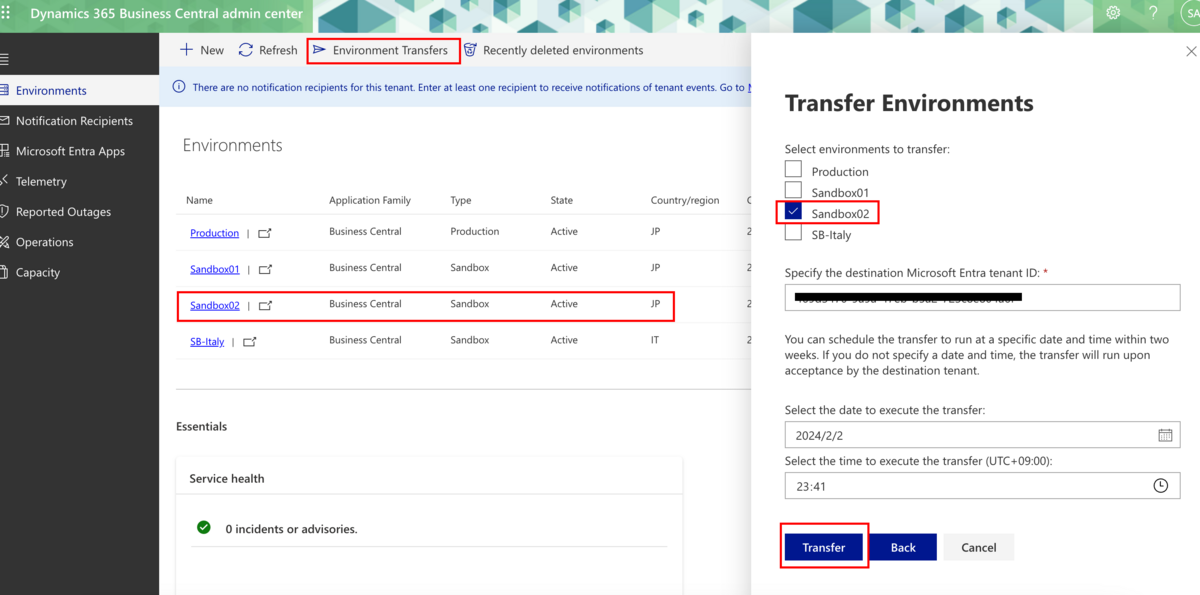
Now Business Central environment can be transferred to another Entra tenant.

In Business Central admin center, click Environment Transfer and then select environments to the other tenant. You can choose multiple environments.

Environment transfer in Business Central admin center

Environment transfer in Business Central admin center

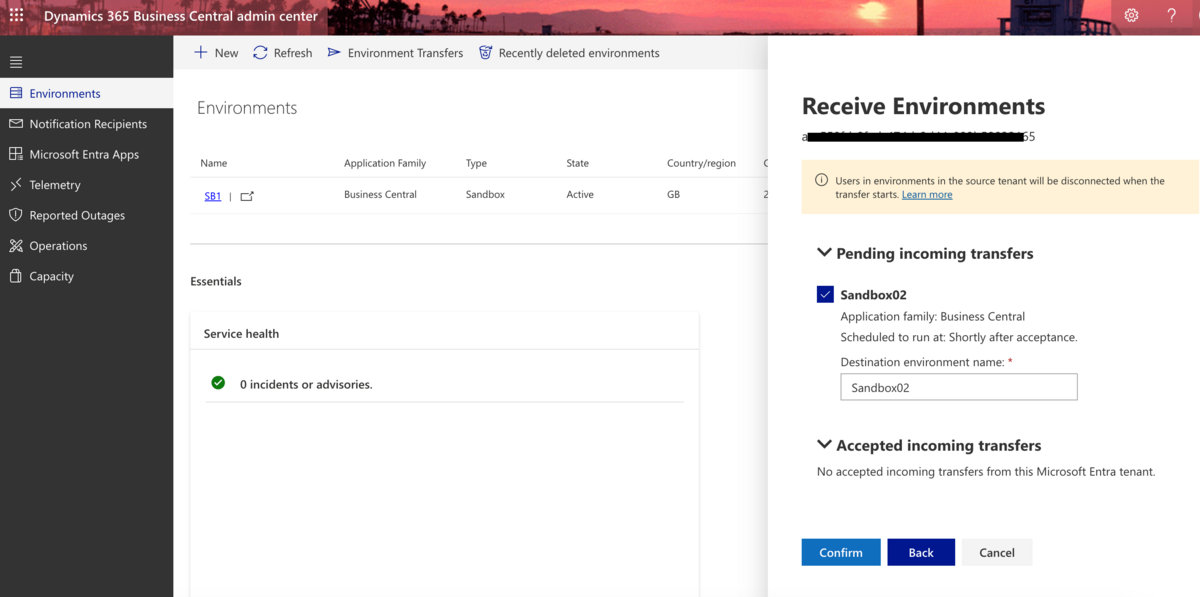
In the tenant that receives the environment, you set the Entra tenant ID to be sent and select the environment in the current tenant.

Business Central received in the tenant

Business Central environment is selected to be received.

Click confirm and wait for a while, the environment is transferred from the previous Entra tenant.

The environment transfer is completed. BC v23.3 environment is newly added in the below image. On 2/2/2024, Business Central version is v23.4.  The extension apps in Business Central are the same as those in the previous tenant.

Environment transfer is completed.

Sandbox02 is gone from the original tenant.

Sandbox02 is gone

Transfer logs about environment transfer are available in Operations of Dynamics 365 Business Central admin center in both tenants.

Logs in Business Central admin center

I have a question about the authentication code of Business Central AppSource App.  If the user in the original tenant transfers Business Central to the other user's tenant, who is the owner user of extensions in the Business Central? Who is responsible for the extension applications, PTE and AppSource Apps, in such transferred Business Central?


Power Automateを活用したDynamics 365 Business Centralの承認フロー

Dynamics 365 Business CentralでCustomerを新規登録した時、承認フローを実行させたいことが多いと思います。Power Automateを使った承認はいかがでしょう。

手順

  1. Customer Templateを作成
  2. Power Automateで承認を作成
  3. Customer登録、承認
  4. 承認完了

1.Customer Templateを作成

Customer Templatesと検索し、Customer Templateを作成します。作成するときBlockedフィールドの値をAllに指定します。

Customer Template Page

Customer Template

2.Power Automateで承認ワークフローを作成

承認ワークフローを作成します。

Create an approval flow from Customer Card

Create Approval Flow

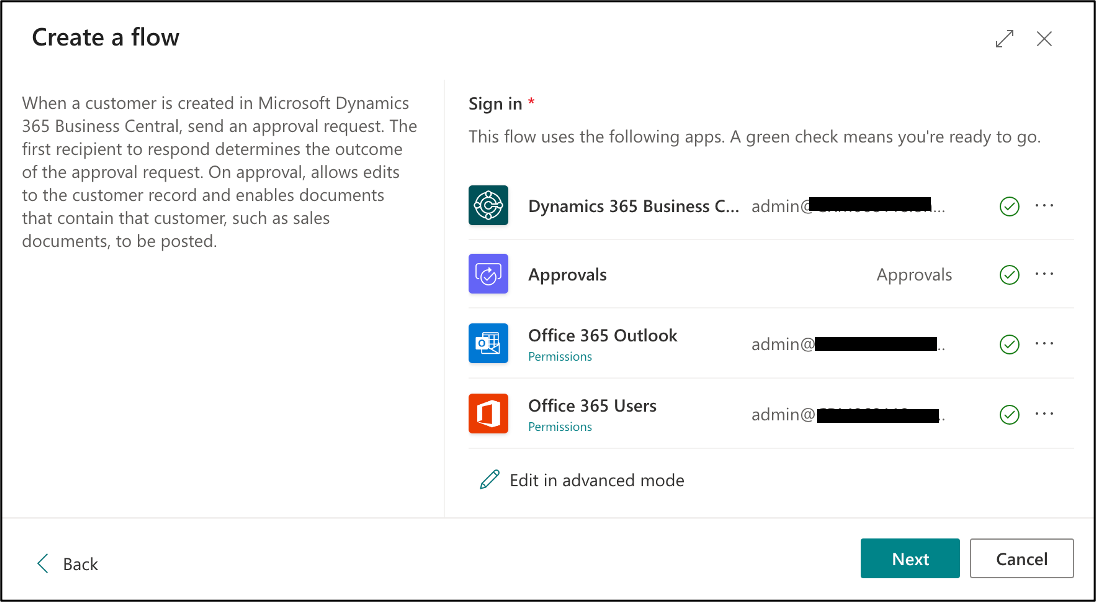
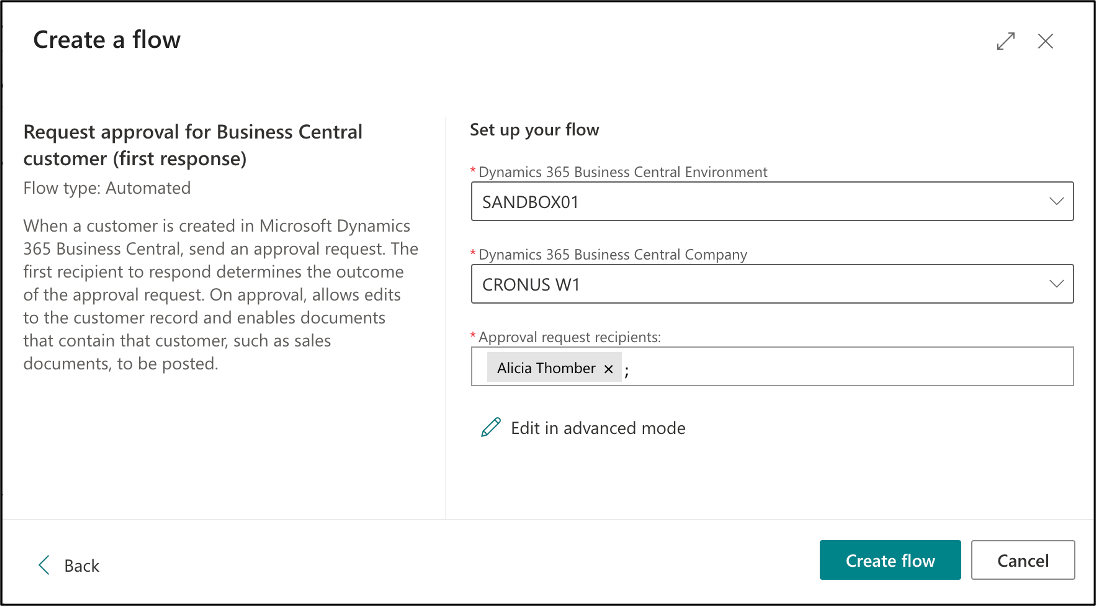
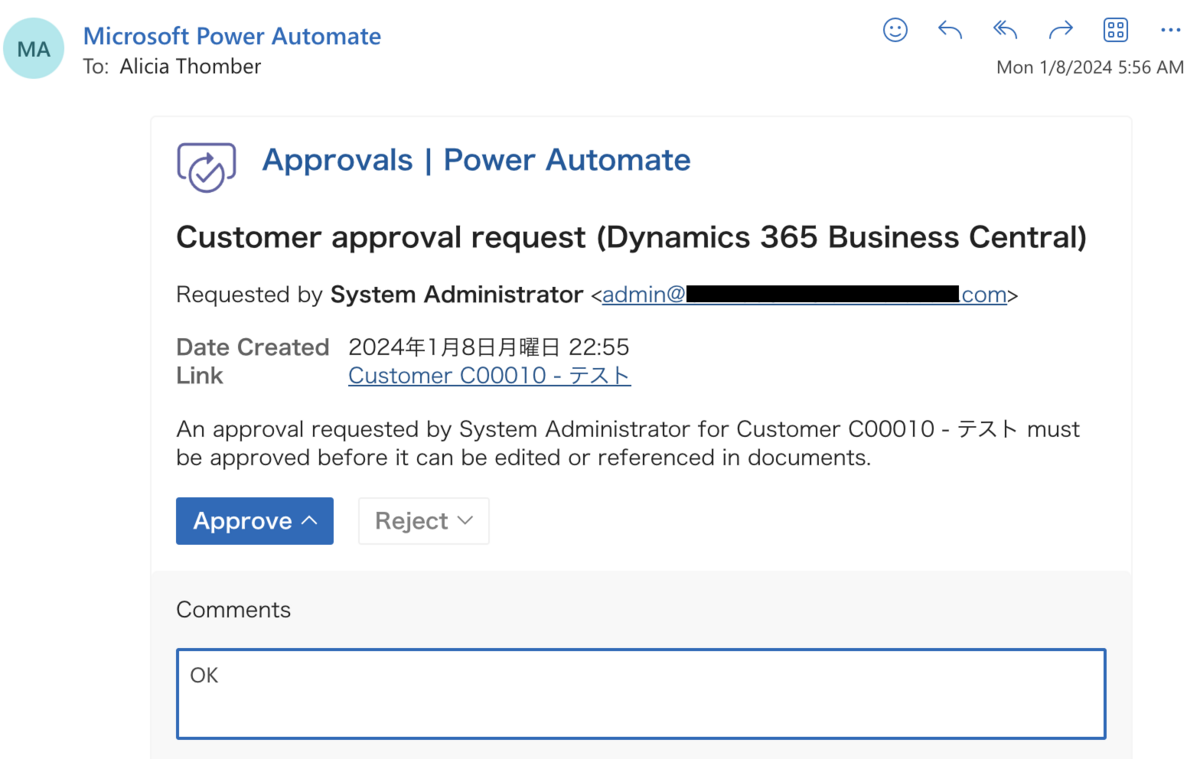
Create a flowという画面で最初のRequest approval for Business Central customer (first responder)を選択してクリックすると、テンプレートが起動しある程度自動で承認フローを作成してくれます。とても便利。内容を確認して「Next」をクリックします。

Create a Power Automate flow from Business Central

Create flowをクリックするとフローが完成します。

Create a Power Automate approval workflow on Business Central

Customerを新規追加時にBlockedをAllとしたため、承認後Blockedが解除されるように少し変更します。Power Automateへ移動し、Approve actionにレコードの更新を追加します。

Add update record in Approve action on Power Automate

Blockedをブランクにするように追加します。「_x0020_」はブランクを指します。

add blank sign in Blocked field

これで新規登録したCustomerを承認時にBlockedがブランクになって、Sales Order等に利用できるようになります。


3.Customer登録、承認

新規にCustomerを登録し、承認依頼を行います。Customerの新規作成時、追加したCustomer Templateを選択します。作成されたCustomerのBlockedはAllになります。

Send Customer approval request.


4.承認完了

Send Approval Requestをクリックすると、承認者にメールが送信されます。承認者はそのメールで承認かどうか選択します。

Approval request mail from Business Central

この依頼メールでApprove(承認)すると、CustomerのBlockedフィールドがブランクになりSales Order等で利用できるようになります。

Approved Customer on Business Central

Business CentralにPower Automateの承認機能を組み合わせることで簡単に実現できます。Business CentralでPower Automateを利用するには、プレミアムコネクターの利用が必要です。


Add Google Map on Business Central Online Map

Business Central can connect online map services like Bing Map. This Gerardo Rentería's  X(Twitter) post explains how to setup.


Business Central Online Map sets Bing Map as default, so I tried to add Google Map. I am not sure if this is violated terms of use or privacy statement on Business Central. If using Google Map is the violation, please tell me. I will delete this post.


How to add Google Map:

1. Open Online Map Setup and go to Parameter Setup.

2. Set Code and Name. (click +New)

3. Set the following urls in fields "Map Service", "Directions Service", and "Directions from Location Serv."

Map Service https://www.google.com/maps/search/?api=1&query={1}+{2}+{6}
Directions Service https://www.google.com/maps/dir/?api=1&origin={1}+{2}+{6}&destination={1}+{2}+{6}
Directions from Location Serv. https://www.google.com/maps/dir/?api=1&origin={10}+{11}&destination={1}+{2}+{6}

Add Google Map on Online Map Parameter Setup page

Online Map Parameter Setup

Google Map will be open by clicking "Show on Map."

Google Map Route

The below is Bing Map.

Bing Map Route

Bing Map route

It looks Bing Map is better than Google Map.


Power PagesでBusiness Centralのデータを表示させる(失敗)

Power PagesでVirtual Tableを利用してBusiness Centralのデータを表示させたいので、頑張ってみた。結果はうまくいきませんでした。

Business CentralとDataverseの同期設定を行う。これは、「Dataverse Setup Connection」またはAssisted Setupにある「Set up a connection to Dataverse」で設定する。Power Platformの環境に新たに「試用環境(Trial)」を作成し、Business Central側と接続させた。新たに作成したPower Platformの試用環境をBusiness Central側で認識するまでちょっと時間がかかった。

Available Virtual Tables - DataverseでDataverse側へ連携するテーブルを選べるので、適当の選択。

Available Virtual Tables - Dataverse


データの連携後、DataverseにBusiness Centralのデータが登録され、Power Pages側で確認できた。

Power AppsからBusiness CentralのVirtual Table(仮想テーブル)が確認できる。

Business Central Customers in Power Apps Virtual Table

同様にPower Pagesでも確認ができた。

Business Central Customers in Power Pages Virtual Table

リストを作成し、アクセス許可もしたが

Create List in Power Pages

List Access Permission in Power Pages

問題が発生して表示ができませんでした。残念。

Error displayed in the website Preview Power Pages


Business Central APIを使って試算表、貸借対照表、損益計算書を出力する

Business Central外で試算表、貸借対照表損益計算書を表示する方法として、Business Central APIを利用して表示させられます。ExcelやPower BIを利用すると、組織アカウントでのみ出力ということもできます。

利用方法は簡単。https://api.businesscentral.dynamics.com/v2.0/<テナントID or ドメイン>/<環境名>/api/v2.0/companies(<会社ID>)/
の後にそれぞれ、

試算表の場合 trialBalances
貸借対照表の場合 balanceSheets
損益計算書の場合 incomeStatements

と日付のフィルターをつけて出力できます。

以下、Buciness CentralのIncome statement(損益計算書)取得例。Power BI DesktopはWindowsでのみのため、今回はExcelでデータを取得してみた。Excelを利用すれば、WindowsMacどちらでも対応できます。

Business Central API URL for income statement

API URL例(income statement 損益計算書

ExcelのPower Queryで、Business Centralの損益計算書データを確認

Business Central Income Statement on Excel Power Query

閉じて読み込むと、Excelで利用できます。

Business Central Income Statement on Excel

同様にPower BIでも利用可能。

途中で接続の資格情報が出る場合、組織アカウントを選択しいつもBusiness Centralにアクセスしているサインイン情報を入力します。

参考:Working with API Limits in Dynamics 365 Business Central - Business Central | Microsoft Learn